DIY Moving Humor: Moving Fragile Dishes in Paper Bags (?!)

20141211-190427.jpg

One of the jokes or “tropes” in DIY (do-it-yourself) Moving is that motivation and morale starts out gloriously high, but plunges to a precipitously low level as the move goes on. Many customers who did their own box-packing told me, “When I started out, I was meticulously wrapping and carefully box-packing everything, but as time ran out, I just threw the items in the box any old way!”

At the latter, more severe stages, the DIY Box-Packer dispenses with boxes altogether. The picture above shows bags(!) of dishes: Not exactly the preferred method for packing and moving fragile items. I like how they put pillows at the top of the bags to try to cushion the plates.

Why You Should Not Load Cleaning Supplies Into the Moving Truck

20130924-154456.jpg
A BOX SOAKED THROUGH AND SPLIT APART BY AN OPEN BLEACH BOTTLE!

20130924-154646.jpg
THE SPILLED BLEACH WET ON THE MOVING TRUCK FLOOR.

As a Moving Worker, it is not pleasant to work inside a truck FILLED WITH BLEACH FUMES!

And if you were the customer being moved, how would you feel if that spilled bleach soiled, say, your $3000 red leather sofa?!

HOW TO MOVE CLEANING SUPPLIES

THE first and main principle is you CANNOT LOAD CLEANING SUPPLIES INTO THE MOVING TRUCK! Boxes are meant to be Stacked! A bottle of bleach within a stacked box within a packed truck of household goods, is–wait for the cliche–a very nasty “accident waiting to happen!” In the pictures above, the customer placed the bleach bottle in the box WITHOUT A CAP(!) or with a loose cap. {You can see how that can happen. The person is rushing to finish the packing before the Movers get there, and “Oh, I forgot the moving supplies!”}

Really the only way to move the cleaning supplies is in your car, preferably in an open plastic crate sitting sitting on the floor in front of the front passenger seat, so you can watch it. CHECK AND TIGHTEN THE BOTTLE LIDS!

Using Colored Tape on Boxes as a Room Identifier

Labeling boxes can be a “bugaboo:”

20130923-170319.jpg

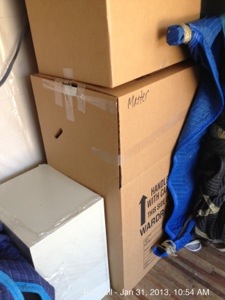
1) Do you black-mark or place a label on the TOP of the box? It is physically the easiest, but when there are several boxes stacked together, you cannot see the bottom boxes’s labels without moving around some boxes. It also can be hard to read the writing.

20130923-170454.jpg

2) Do you black-mark or place a label on the SIDE of the box? This is definitely the preferred way if you have many stacks of boxes. YOU CAN SEE THE LABEL OF EACH BOX! But it is physically more difficult. It takes TRAINING, and intuitively seems like overkill, even if it is not.

20130923-180716.jpg

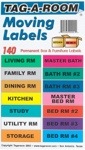
3) Do you buy those pre-printed labels that say “Living Room,” “Master Bedroom,” “Bed Rm #2” and so on.

These labels can work, but:
A) They are an extra expense
B) You have a tendency to run out of labels in a particular category (you have more than 10 boxes going to the basement etc)
C) You might want it to say “Josh’s bedroom” rather than “Bed Rm #3)

20130924-155351.jpg

This brings us to new box-labeling technique I saw recently:

20130923-164333.jpg

“STRIPS OF COLORED TAPE ACROSS THE TOP OF THE BOXES AND A COUPLE INCHES DOWN THE SIDE (With the different colors associated with different rooms)

ADVANTAGES OF THIS METHOD

1) The quickest form of identification!
A) You don’t have to struggle to read someone’s scribbling
B) You don’t have to hunt for the label–is it on the top or on the side? The tape is on both the top and the side (It reminds me of the yellow security labeling “Customs” might use at the airport)

DISADVANTAGES OF THIS METHOD

1) You can still run out of colored tape for a particular room.

ECONOMIC ISSUES

The “Penney Wise, Pound Foolish” fallacy is rampant in Moving. The person being moved is spending hundreds–or more likely THOUSANDS–in dollars and time. Small efficiencies like improved box-labeling pay dividends at several different stages of the move:
1) During box-packing
2) During the actual move: The brightly taped boxes make it easier for the Movers to see which boxes go to which room. On the hand trucks, they stack like-colored boxes together.
3) During box-unpacking

CONCLUSION

I am not recommending or selling a particular labeling method. But simply opening up the discussion. What kind of box-labeling system do you use?

The Amazing “Mini Dishpack” Box

I only recently discovered this box. It is the “Mini Dishpack” box at 18″ x 18″ x 14″ (2.63 cubic feet) or exactly half the height of the standard-sized Dishpack box at 18″ x 18″ x 28″ (5.25 cubic feet). The great thing about Dishpack boxes in general is they have double-thickness cardboard. While doing moves through McGregor Moving for 19 years, I have NEVER had anything break in a Dishpack box if it was halfway properly packed. The double thickness cardboard is really a lifesaver. The main two applications I’ve found for the Mini Dishpack so far:

1) When you have just a few more fragile items to box-pack and you want the double thickness protection of a Dishpack, but you don’t need a full 24″ tall Dishpack. Previously In this situation I would have to:

A) Go with something like a single thickness 3.0 cubic foot box, and hope it was strong enough, or

B) Nest a smaller box within a bigger box, or

C) Use the standard size 24″ tall Dishpack box, and have to work hard to fill the remainder of the box with other items–maybe filler items like towels–or actually waste expensive packing materials by filling the excess box with newsprint, or packing peanuts, or something even more expensive like bubble wrap or mircrofoam.

2) You have something like a heavy rod-iron 16″ statue. You or the customer may not want to pay to have the statue wood-crated, but a standard single-thickness box is really too flimsy.

ENTER THE MINI DISHPACK BOX!

The “Mini Dishpack Box” is part of my regular box-packing arsenal now!

20120305-203042.jpg

Pack Hummels in Dish-Pack Boxes

Pack fragile items like Hummels and other expensive figurines in Dish-Pack boxes–see picture below. If you
have the original figurine boxes, use those, and then place multiple figurine boxes within a Dish-Pack box. The Dish-Pack is always your preferred box for fragile items since it has double-thickness cardboard walls, and it’s size and shape prevents stacking them too high.

If you don’t have the original figurine boxes, you can use pieces of cardboard, packing paper, and bubble wrap to fashion a box. You can then nest that box within a 1.5 box, and even a 3.0 box before placing the nested boxes within a Dish-Pack box.

DON’T PACK HUMMELS IN THIN OFFICE FILE BOXES as this customer did below–see their labeled box.

CAUTION: If you have professional movers move you, their insurance will not cover you UNLESS THEY DO THE BOX-PACKING. Because of this, many of our customers box-pack many of their loose items, but let us pack their china, figurines, and other especially expensive items.

Pack “Too Small” Boxes Within Larger Boxes

These Boxes Should Be Packed Inside a Larger Box

"Same Here"

These small, light boxes should have been placed inside a larger box–like a “3.0 cube” box.  The movers can much easier and faster handle one “3.0 cube” box than three or four tiny boxes.  But list on the larger box the labels of the smaller boxes contained within.

Wrapping Pictures in Paper Pads

paper pads

The normal “deluxe” way of wrapping/packing pictures and paintings is to wrap it first in a paper pad, and then put it in a four-piece picture box. Putting together four-piece boxes is very time-consuming, but certainly recommended for very high-value pictures and fragile mirrors.

Often a good compromise is to wrap the picture/painting in just a paper pad. It’s easy and the paper pad is clean unlike a quilted pad which has probably been through the “ringer” many times, and may be full of dirt and mud.

Preparing Lamps For the Movers to Move Them

desk-and-pole-lamps

Lamp shades cannot go into the moving truck by themselves. They need to be packed in boxes–one lamp shade per box. You can surround the lamp shade with packing paper. Use the smallest box possible for the lamp shade. You will probably use either a 1.5 cube, 3.0 cube, or 4.5 cube box.

If the base of the lamp is not fragile–if it’s brass or some hard material, then the Movers can just wrap the lamp base in a pad and place it in the truck. If the lamp has a vase-like base, then it needs to be placed in a box.

Movers can take pole-lamps into the truck, as long as the lamp shade is removed.

Preparing Paintings and Pictures To Be Moved

Glass Covered Painting, and small enough to go in Dish-Pack Box

Glass Covered Painting, and small enough to go in Dish-Pack Box


Dish-Pack Box in which small paintings and pictures can be packed

Dish-Pack Box in which small paintings and pictures can be packed

For moving purposes, there are four categories of paintings and pictures:

1) Ones small enough to fit in a Dish-Pack Box:

Since a Dish-Pack dimensions are around 24” x 20” x “34, the picture should be small enough to comfortably fit in the box. Wrap the pictures in Packing Paper or even Bubble-Wrap—though Bubble-Wrap is usually not necessary—and you can fit multiple pictures this size in Dish-Pack Box

2) Paintings or Pictures too large to fit in a Dish-Pack box, and under $1000 in value which are covered with glass:

Because of its glass-covering, the painting/picture might be moved safely covered in either a quilted pad or a paper pad—as long as the picture frame is not fragile or expensive. If it is, then we should use the next higher level of protection—the Picture Box. The best way is to wrap the picture in a Paper Pad before inserting it into the Picture Box. If you don’t have a Paper Pad, you can also use Packing Paper or Bubble-Wrap. Make sure you protect the corners.

Framed Oil Painting--Needs be covered in Paper Pad, then placed in Picture Box

Framed Oil Painting--Needs be covered in Paper Pad, then placed in Picture Box

Picture Box

Picture Box

3) Paintings or Pictures too large to fit in a Dish-Pack Box, and under $1000 in value which are not covered by glass—“Oil Paintings:”

You don’t want a dirty quilted pad to touch the surface of an oil painting, and they usually have decent frames so a Picture Box is usually required. The best way is to wrap the picture in a Paper Pad before inserting it into the Picture Box. If you don’t have a Paper Pad, you can also use Packing Paper or Bubble-Wrap. Make sure you protect the corners.

Pictures Wrapped in Paper Pads Without "Picture Boxes" Surrounding Them

4) Paintings/Pictures over $1000 in value:

$1000 is obviously an arbitrary even number, and the number should climb higher with inflation, but in 2009 most Movers will think about having a wooden crate made for pictures in this value category. And there are many pictures in Atlanta homes valued at 10K, 50K and higher. Movers are not going to put a high-value picture in the truck without it being in a wooden picture crate. If it’s a local move, the homeowner/customer does have the option to move the picture himself–in his car–in order to save the extra cost of having the wooden crate made. Check to make sure your vehicle will accommodate the size of the picture.

The Physical Strain of Packing and Moving Boxes


I bet these boxes are empty!

I bet these boxes are empty!

WHAT AN UNREALISTIC ADVERTISING SHOT.   If these boxes were full, she would have to be holding them from the bottom, and this girl could probably not carry both at once!


Yesterday I booked a job for a couple about 65 years old who are moving close-by.  They want to move all the boxes themselves.
I reminded them of the physical strain involved in packing and in moving boxes:
First you have to get the items off the shelf.  You have to get down on your hands and knees for the low shelves, and on a stool for the high shelves.
Once they are wrapped, you need to place them in the box.
Once the box is packed and closed up, you have to get it out of the way.  You have to carry it somewhere and probably stack it on top of other boxes, bending down or stretching up to do it.
Then you have to get the stack of boxes to your car–either carrying each box or rolling the stack on a handtruck if you have one.
Then you have to place it in the car, and even with SUV’s some bending over is required.  Remember box-packers cost less than the orthopedic surgeon.